

Your First Portal Mission
Choose a Portal mission, select ground units, use Instant Resolve or Send, and collect your rewards. Includes screenshots and help with common problems.
Topics covered: Your First Portal Mission: Step-by-Step Guide | Interstellar Empires
Complete a standard Galactic Mission from the Portal and collect its rewards. Start with an open Exploration mission and check your selected force before committing.
What you need
Build a level 1 Portal and have ground units ready at your base. Claim the Portal beginner task before continuing. If you are still following the mentor, finish the highlighted steps in Your First Session.
This guide covers standard Galactic Missions. Manually dialing another player's address, a Secret Base, an Encrypted Cache, or a Subspace Anomaly is a different activity.
1. Open Galactic Missions and choose a mission
Open Portal from the game navigation, then Galactic Missions. Early commanders see missions directly before manual dialing unlocks. Select an open mission to view its details.
Check the mission name, recommended influence, and expiration countdown. Exploration is available from Portal level 1, but its outcome can include combat. Recommended influence is guidance, not a guarantee that every unit will survive.
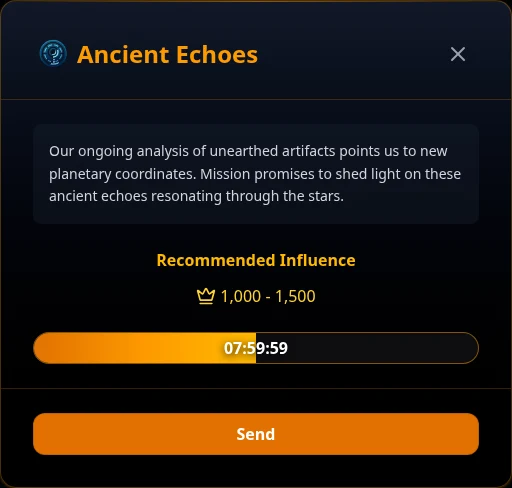
2. Open the unit form and select ground units
Select Send in the mission dialog to open the unit form. Use the unit sliders or amount fields to choose the force you want to commit. Portal missions use ground units such as Rangers, Guardians, and Phantoms. Ships do not take part.
Compare your selected force's influence with the mission recommendation. If the game warns that your force is weak, go back and add units or choose a more suitable mission. Units already away, training, or injured cannot be selected.
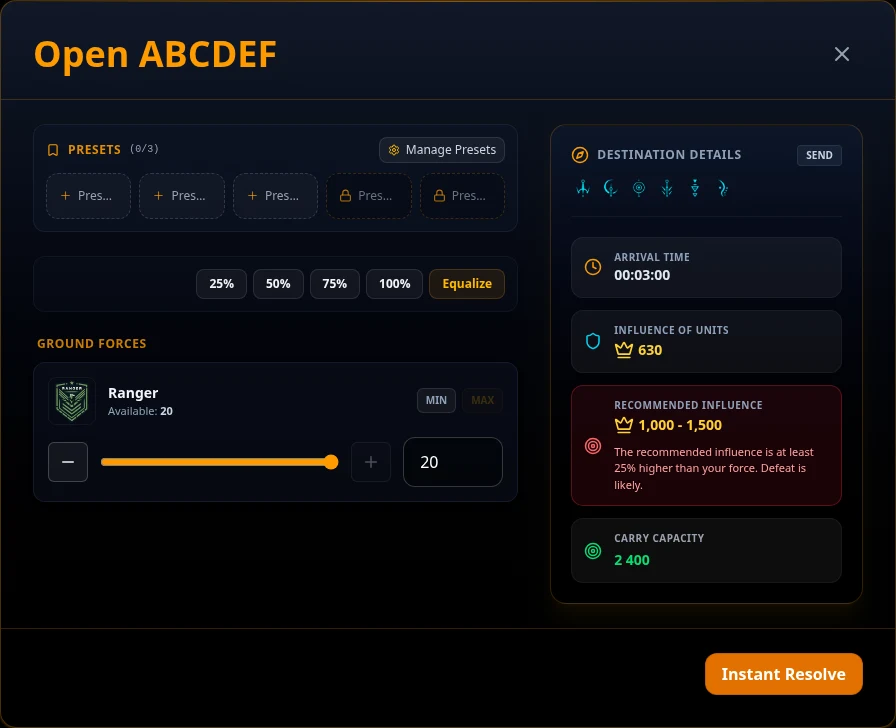
3. Resolve the mission
During the beginner guide: select Instant Resolve. The final Send action stays unavailable until the early guide is complete. Below Command Center level 3, standard missions do not consume an Instant Portal Mission item.
After the beginner guide: Send starts a timed mission. Instant Resolve remains an option when you qualify. From Command Center level 3, it uses an Instant Portal Mission item unless your active trial or Commander Status includes unlimited instant missions. Check the button and any confirmation before continuing.
Instant Resolve applies the mission outcome and any combat immediately. Surviving units return directly to base. With Send, wait for the mission and the units' return journey before using those units again. Follow the live timers in the interface.
4. Read the result and collect rewards
Open Reports after the mission completes. Read the outcome to see rewards and any unit losses or injuries. Use Read and Claim All to collect available report rewards. If the mission completed a beginner or daily task, return to Tasks and claim that reward separately.
You are done when the mission result is available, report rewards are claimed, and surviving units are back at your base. A successful mission does not mean every unit survived.
If something is unavailable
- No open missions: existing missions may be finished or expired. Check the next refresh shown in Galactic Missions. Upgrading the Portal can unlock more mission slots and types.
- No units to select: finish training or wait for units to return. Injured units need healing before they can take part again.
- No final Send action: complete the mentor's early objectives using Instant Resolve.
- Instant Resolve unavailable: check your Command Center level, item supply, and active Commander Status benefits. After onboarding, use Send if you do not have instant resolution available.
- No reward in your counters: open Reports and claim it, then check Tasks for a separate task reward.
What to try next
Return to Your First Session to finish the beginner objectives. For mission types, unlock levels, and possible rewards, see the mission reference. Learn about your Rangers before committing a larger force.

